Floral candleholder christmas diy bostik

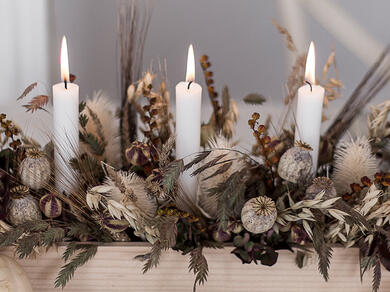
Flowers and candles are two of the most popular home accessories used to bring life and colour to indoor spaces. In this tutorial we'll show you how to combine the two to create a DIY flower candle holder that'll sit pretty on the centre of your table or windowsill.

Upcycle your old, dry bunches of flowers and choose to reuse them instead of throwing them away. Although it may not be obvious, dried flowers can be just as beautiful as fresh flowers and they last for months, if not years, making them a more sustainable choice.

Discover how to create your own floral candle holder using our innovative light-activated adhesive, Fix & Flash, in this step-by-step guide.
Instructions

Disclaimer

We have launched a new and improved version of Fix & Flash. Please note this guide was created using the previous model but is still suitable for the new version. Browse the new Fix & Flash today.

Attention

This tutorial features items that could become a fire hazard. It is extremely important to ensure the dried flowers used in the creation of your DIY flower candle holder are fireproof, or non-inflammable for safety reasons.

Some dry flowers are covered with product to protect against a start of fire, and fire-retardant sprays can be used for those that are not already fireproof.

Step 1: Sand the pieces of wood

To create your DIY flower candle holder, start by gently sanding the pieces of wood so that they are all smooth and have no rough edges.

Step 2: Cut the copper tube

Cut the copper tube with a tube cutter or hand saw to create three 7 cm high pieces that will serve as a candle holder.

Carefully sand the ends of the tubes to create a smooth edge.

Step 3: Apply Fix & Flash

Add a drop of Fix & Flash glue onto one edge of the copper tube and stick them 5cm apart onto the long piece of wood (44.5cm x 7.5cm).

It is important to place the tubes so that there's space either side of them for your foliage to be added.

Step 4: Assemble the wooden base

Next, it's time to combine the five pieces of wood together to create a rectangular tray - this will house your dried flowers.

To do this, apply blobs of Fix & Flash glue to the wooden edges and shine the light to set the glue in place. You've created the base of your floral candle holder.

Step 5: Cut the floral foam

Once your rectangular tray is set in place, cut the floral foam with a paper cutter to size. You will need it to line the bottom of your rectangular tray, taking care to accommodate the copper tubes.

Step 6: Add the flowers and candles

Plant the dried flowers into the foam by inserting the stems. Continue adding all your dried flowers until the rectangular box is full.

Next, insert the candles into the copper tubes to finish and set up the festive table.

Ta-da! You're now ready to light your dried flower candle holder and lay it on your table or windowsill.

See all products