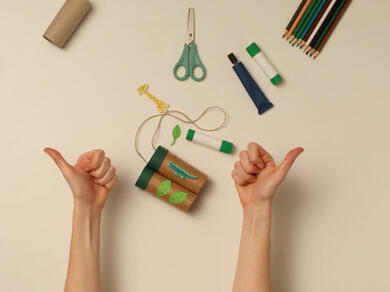
How to make binoculars from toilet paper rolls

Close your eyes and imagine this...

One minute you’re sitting at the kitchen table, and the next you’re exploring a jungle, scanning the horizon from a pirate ship, or floating through space like an astronaut. With a little imagination and some simple craft supplies, kids can step into a whole new world - all by learning how to make binoculars from toilet paper rolls.

This fun and easy project turns everyday cardboard tubes into craft binoculars that unlock hours of pretend play. These cardboard tube binoculars are perfect for little explorers, secret agents, wildlife spotters or dinosaur hunters. Best of all, this is a low-cost, screen-free activity that builds creativity, confidence and fine motor skills.

Whether you call them DIY binoculars or just “magic looking tubes”, this simple craft is guaranteed to spark big adventures.

Step-by-Step: How to make cardboard tube binoculars

When kids have had enough of screens, a simple hands-on activity can work wonders. Craft projects like these DIY cardboard tube binoculars encourage imagination, storytelling and independent play. Once finished, kids don’t just have a toy - they have something they made themselves, which boosts confidence and keeps them entertained for hours.

A couple of cardboard tubes can become anything. With these craft binoculars, cushions turn into islands, hallways become safaris, and bedrooms transform into outer space. Kids can spy on dinosaurs, spot jungle animals, watch birds, or search for treasure, all without leaving home.

Instructions

Step 1: Assemble your kit

Lay out all your materials before you start. You’ll need two toilet paper rolls, craft paper, glue, scissors, clothes pegs, string and decorations.

Important

When cutting the materials for this toilet paper binoculars make, please ensure kids are supervised to use scissors. If necessary, an adult should use the scissors on the child's behalf.

Step 2: Wrap your toilet paper tubes

To start your craft binoculars project, cut two pieces of paper slightly longer than each cardboard tube.

Apply Blu Glu stick along one edge and wrap tightly around the tube and glue down the other edge.

Snip small cuts at each end and tuck the paper inside using glue.

Step 3: Make handles for the DIY binoculars

Cut two long strips from a piece of coloured paper – each around 2cm wide.

Apply Blu Glu stick to a length of the paper and roll it around one end of the toilet roll tube, pressing it firmly into place. Repeat for the other tube.

Step 4: Stick the two tubes together

Apply a thin line of All Purpose glue along the length of one cardboard tube. Press the second tube against it, lining them up evenly.

Use a clothes peg at each end of the tubes to hold the two tubes together, until the glue dries.

Step 5: Add the string

Cut a length of ribbon, string or twine and apply a dot of All Purpose glue to the outside each of the craft binoculars, just below the paper bands (no need to make a hole!).

Press the ends of the twine firmly against each glue spot and hold in place for a few moments as the glue begins to dry, then leave to dry fully.

Step 6: Decorate the craft binoculars

Now the fun part! Use Blu Glu stick to add foam shapes, stickers or drawings to personalise your binoculars. Camouflage them for jungle missions or make them bright for space adventures.

Tip:

Once you’ve finished using your Blu Glu stick, make sure it stays in perfect condition for your next project: simply retract the glue by turning the base anti-clockwise, and replace the cap.

Step 7: You’re done!

Your toilet paper roll binoculars are ready – now it’s time for the kids to go and play and see what they can spot!

Play idea: go on safari

Hide toy animals, soft toys or printed pictures around your home and challenge kids to spot them using their DIY binoculars. You can also use them on walks or car journeys to spot colours, shapes or objects.

Need a different glue?

Bostik offers a wide range of stationery and craft adhesives, perfect for every creative project - from simple kids’ crafts to more detailed makes.

For more ideas, visit our Ideas & Inspiration page and search #CraftWithBostik for even more fun projects.

See all products